Getting Started with Django
👋 Hi there, I am Nirmal. I am a former software engineer with a keen interest in data science and analytics domains. Besides, I love to contribute to open source and help others to understand various tech stuffs.
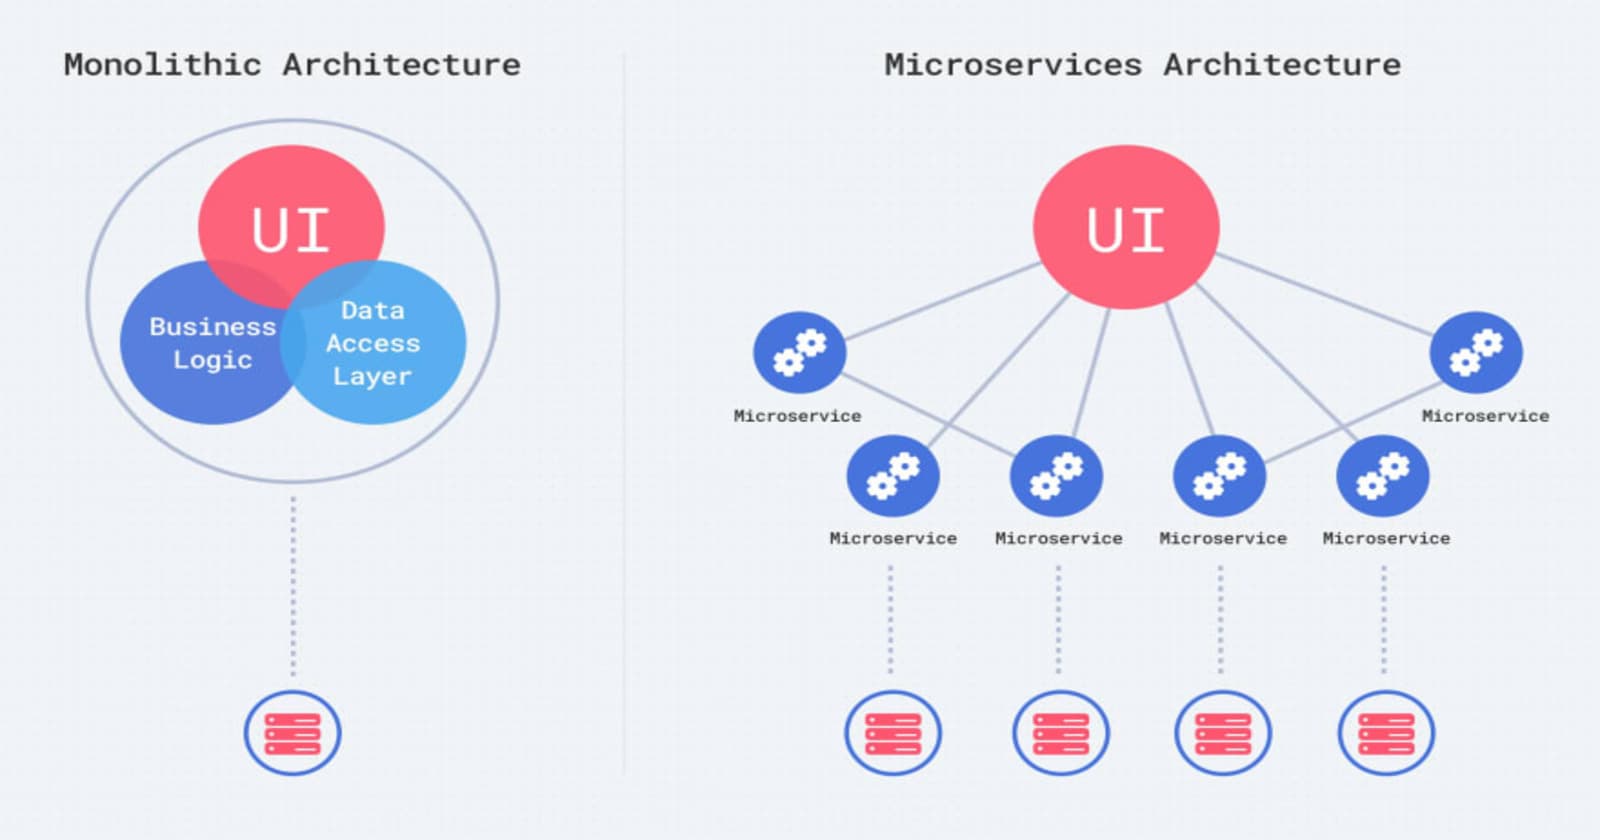
In the expansive fields of web development frameworks, Django stands out as a powerful and favored option for creating robust web applications. As an open-source Python web framework, Django was specifically designed to simplify the web development process while adhering to the principle of "don't repeat yourself" (DRY). Its focus on efficiency, scalability, and security has captured the hearts of developers worldwide.
Features
Django boasts an array of distinctive features that set it apart:
Scalability: The modern world demands web applications that can handle an ever-increasing number of users and data. Django's scalability is a result of its ability to efficiently manage database queries, handle caching, and optimize code execution. This scalability makes Django suitable for applications ranging from small startups to large-scale enterprises.
Security: Security is of paramount importance in the modern digital landscape, and Django takes security seriously. It comes with built-in features to prevent common web vulnerabilities like SQL injection, cross-site scripting (XSS), and cross-site request forgery (CSRF). Additionally, Django's authentication system allows for secure user management.
Versatility: Django's versatility is evident in its ability to support various types of web applications. Whether it's a content-heavy website, an e-commerce platform, a social media network, or an API-centric application, Django can handle diverse requirements.
Community and Documentation: Django boasts an active and robust community of developers, contributing to its constant growth and improvement. The official documentation is extensive, well-maintained, and beginner-friendly, making it easier for developers to learn and utilize the framework effectively.
Django REST Framework: In the modern world of web development, APIs (Application Programming Interfaces) play a vital role in enabling seamless interactions between different services and platforms. Django's integration with the Django REST Framework simplifies the process of building powerful and scalable Web APIs.
Setting Up a Django Project
Creating a Virtual Environment
A virtual environment allows you to create an isolated Python environment for your project, ensuring that the dependencies you install don't interfere with other projects on your system.
# On Windows
python -m venv project_env

# On macOS and Linux
python3 -m venv project_env
This will create a new directory called project_env containing the virtual environment.
To activate virtual environment in your project run
project_env\Scripts\activateon Windows orsource project_env/bin/activateon Mac OS X or Linux will activate your virtual environment.
Now that the virtual environment is set up, it's time to install Django. Within your virtual environment, use pip to install Django:
# On Windows, macOS, and Linux
(project_env) ~/pip install django
Creating the Django Project
With Django installed, you can create a new Django project. Navigate to the folder where you want to create your project, and run the following command:
(project_env) ~/django-admin startproject myproject
This will create a new directory named myproject, which will be the root of your Django project.Inside the myproject directory, you'll find the initial folder structure of your Django project:
myproject/
|-- manage.py
|-- myproject/
    |-- __init__.py
    |-- asgi.py
    |-- settings.py
    |-- urls.py
    |-- wsgi.py
manage.pyfile is a command-line utility that allows you to interact with your project.settings.pyfile contains the configuration of your website.asgi.pyconfigures the application to handle asynchronous web servers using the ASGI (Asynchronous Server Gateway Interface) specification.wsgi.pyconfigures the application to work with traditional synchronous web servers using the WSGI (Web Server Gateway Interface) standard.
Django provides a pre-built and pre-configured development server that you can easily run using the command
pythonmanage.pyrunserver. When you navigate to the locally deployed Django address, typically at http://127.0.0.1:8000.
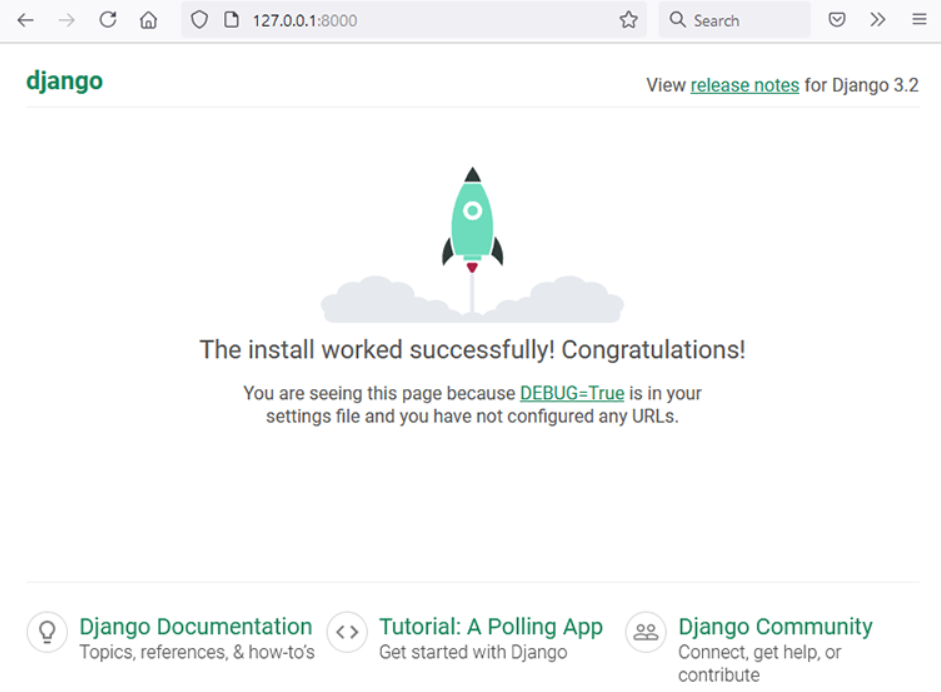
You have successfully run your Django first application.But you may be curious to see some custom output by your own.Let's do that.
Creating Django apps
In Django, a web application is typically divided into smaller components called "apps." Each app handles a specific functionality or set of related features within the overall project.
To create a new app, navigate to the root directory of your Django project using the terminal (where the manage.py file is located) and run the following command:
python manage.py startapp <app_name>
#For example
(project_env) ~/python manage.py startapp hello_app
This command will create a new directory named hello_app, which contains the initial structure of the app:
hello_app/
|-- migrations/
|   |-- __init__.py
|-- __init__.py
|-- admin.py
|-- apps.py
|-- models.py
|-- tests.py
|-- views.py
This will create another directory called hello_app with several files:
__init__.pytells Python to treat the directory as a Python package.admin.pycontains settings for the Django admin pages.apps.pycontains settings for the application configuration.models.pycontains a series of classes that Django’s ORM converts to database tables.tests.pycontains test classes.views.pycontains functions and classes that handle what data is displayed in the HTML templates.
Including the App in Settings
After creating the app, you need to include it in the project's settings. Open the settings.py file inside the myproject directory and locate the INSTALLED_APPS list. Add your app name (hello_app) to the list:
INSTALLED_APPS = [
    # ...
    'hello_app',
    # ...
]
By adding your app to the
INSTALLED_APPSlist, Django recognizes the app and includes it in the project.
Writing the "Hello, World!" View
In Django, views handle the logic for processing HTTP requests and returning responses. Let's create a simple "Hello, World!" view inside the views.py file of the hello_app:
# hello_app/views.py
from django.http import HttpResponse

def hello_world(request):
    html_content = "<h1>Hello, World!</h1>"
    return HttpResponse(html_content)
Creating a URL Mapping
Now that we have our view defined, we need to map it to a URL. Open the urls.py file inside the hello_app directory and add the following code:
# hello_app/urls.py

from django.urls import path
from . import views

urlpatterns = [
    path('hello/', views.hello_world, name='hello_app'),
]
In this code, we import the
hello_worldview we created and map it to the URL path/hello/.
Include the App URLs in the Project
To make the app's URLs accessible within the project, open the urls.py file of the project (located in the myproject directory) and include the app's URLs using the include function:
# myproject/urls.py

from django.contrib import admin
from django.urls import path, include

urlpatterns = [
    path('admin/', admin.site.urls),
    path('hello_app/', include('hello_app.urls')),  # Include the app's URLs
]
Now, when you access
127.0.0.1:8000/hello_app/hello/.You will see below output:

Congratulations! You've successfully set up a Django project from scratch. Now you can start building your web application using Django's powerful features and elegant design.